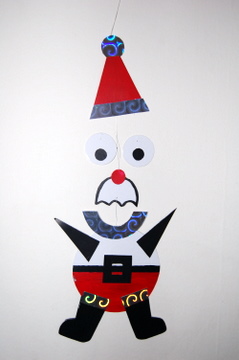
Jane: I
was digging around my parents’ Christmas decoration box recently and came
across an old, homemade Hanging Santa. He was always a real family favourite, strung
up from a hook in the middle of the hall corridor so he kicked everyone in the
eye every time they passed (funny how no one thought of putting him anywhere
more convenient). Twenty years on, he was looking a little ragged around the
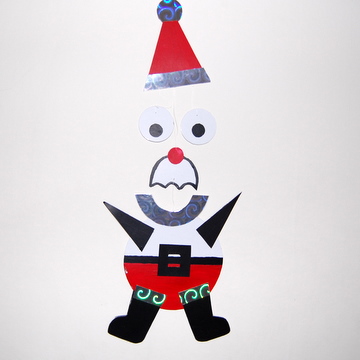
edges, so I decided to make him afresh for Xmas 2008. And here he is, looking
very sparkly and chipper, raring to go for some chimney action come the 25th.
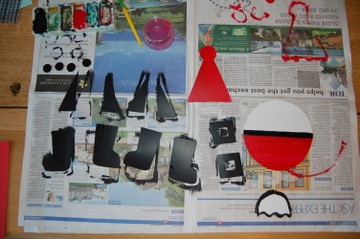
Hanging Santa is easy to make, once you’ve cut out the shapes, but he does take a bit of faffing-around time to let paint dry etc. All you need (that famous phrase) is a piece of white cardboard, some zany metallic card for decoration (or use cotton wool instead), black and red paints, glue, a needle and white thread. First draw
and cut out the shapes from the white cardboard: a big circular body; four
boots (you stick two sides together); four triangular arms (ditto); one
moustache; two large circular eyes; four small pupils; two belt buckles; one
hat with a pompom shape on top; two small circles for the nose; and two half
moon collars.
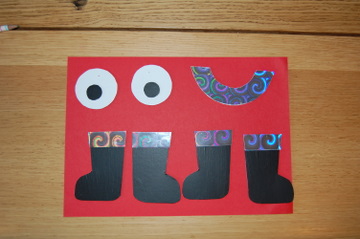
Then get
out the paints: paint the boots, buckles, four pupils and arms black. Paint the
hat red on both sides. Paint the body half red, and paint a black belt line, on
both sides. Paint a black edge around the moustache, on both sides.
Once all this has dried, take your zany metallic card and cut out four tops for the boots, stick on with glue. Cut out two metallic circles to fit the collars. Stick a black pupil on to each side of the two eyes. Stick the two red noses on top of the moustache, one each side. Cut out
two metallic circular pompoms for the hat. Thread a double piece of thread
through the original pompom, tie fast – this will be the thread your Santa
hangs from. Then stick the zany metallic pompoms over each side to cover.
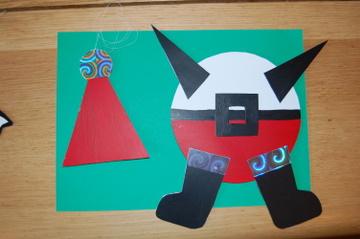
Now you
can build the Santa. Stick a boot on each side of the body, fitting them
together neatly as shown. Repeat on the other side. Do the same with the arms.
Stick a buckle on each side of the body over the belt line. Then stick
the two plain collars together over the body. Using a needle and thread, make a
hole in the centre of the collar (where it overlaps the body) and tie fast one
end of the thread. With the other end of the thread, make a hole in the bottom
of the moustache, and tie fast at the required length. Stick the two metallic
collars on top of the plain collar, one on each side of the body, to cover the
thread hole.
In the
centre of the red nose, make another hole with the needle and thread and tie
fast. Attach the other end of the thread to the middle brim of the hat (about
1cm in). Tie fast at required length. Now hang the two eyes from the hat brim
with thread, and tie fast. Stick over two lengths of metallic card on the hat
brim, to cover the holes. And there
you have him – a Hanging Santa. Okay, mine looks like a gormless Homer Simpson
(it’s the moustache) though he’s still rather cute, breezing around happily
on the wall. |