|
26th Apr 2009
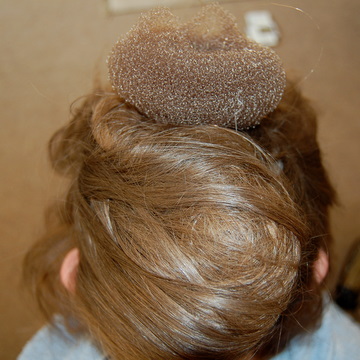
Edie: On Saturday night my parents went out to a 1950s party. My mum did her hair really curly and I wanted to have a go with a different style too. So the next day we set up a hair salon in the front room. My mum got out all her hair things that she was going to use to give me a beehive hairstyle.
You will need: Comb and brush Hair pins (we used kirby grips and bun pins) Hairdryer Hair doughnut Styling lotion Hair spray
This is me with nothing done to my hair, before we started.
To make the beehive, my mum put styling lotion in first, then she made a parting across the top of my head from ear to ear. She pinned the front half out of the way, and backcombed the other half so it was really bushy. She twisted it upwards, pinning it in place on the back of my head, leaving a little pony tail sticking out of the top. She then pinned the doughnut on top of my head to cover the little pony tail bit.
She backcombed the front half of my hair next. She did this a lot, so it stood up nicely. Then she twisted this upwards and backwards over the doughnut, tucking it in with hair pins so it stood up high. Then she sprayed loads of smelly hairspray over the whole thing.
I was desperate to see the finished product, so ran upstairs to the bathroom mirror to have a look. I felt a lot different and was really amazed. I thought I looked really grown up and from the olden days. It was a lovely feeling, but I didn’t dare go out of the house.
16th Apr 2009
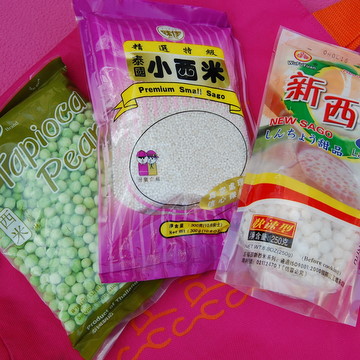
Jane: It all started with sago. A few weeks ago in a foreign hotel, I tasted my first sago pudding in two and a half decades. It was exquisite: a tiny bowlful of opalescent sago pearls and fresh mango slivers drifting in fragrant coconut milk. All those memories of stodgy, evap-milked, school frogspawn vanished instantly. This was a sago pudding I (and I hoped the kids) could learn to love. If only I could find out how to make it. Back home, I went on a search for sago. No luck in any of the big supermarkets or health food stores. Even in the foreign food shops I could only find weird hybrids. The version which looked most like sago and advertised itself as ‘premium small sago’ was actually made from potato starch (whereas sago comes from sago palm stems). ‘New Sago’, a Chinese, fast-cook variety, was made from tapioca (a starch derived from cassava roots, not sago palms). I bought them both anyway. Plus the large, green ‘Premium Quality Tapioca Pearls’, dyed with pandan leaf extract so they looked just like bullet-hard dried peas.
I found a chilled mango sago pudding recipe on the internet and started simmering the tiny potato starch pearls, adding coconut milk and mango, all the time hoping for manna. The recipe said it would make enough for four people but I managed to get eight bowlfuls, and cooled them as directed so they stood stiff with a thick, yellowish milk skin on top, the little potato pearls shining through, before proudly presenting them to the family as pud. ‘Sordid,’ ‘Solid starch’, ‘Godawful’ were a few of the kinder comments. Even I found it difficult to swallow more than two mouthfuls of this cold, starchy wodge. Into the bin it went.
But I was still determined to produce a decent frogspawn pud. I’d used the potato pearls – now it was time for the green tapioca (which I remembered as tasting similar to sago) to grace our dinner table. It was Easter, we were staying with my parents, and opposition was stiff: every time I mooted the green tapioca pud option, there was an outcry from the junior members of the family.
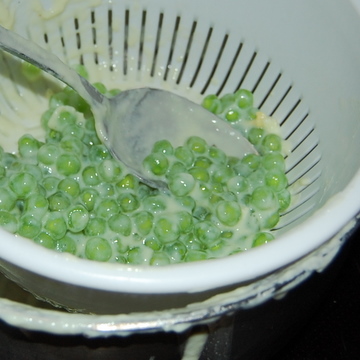
Egged on by Mal, the kids hid the tapioca from me. It took a while but I eventually found it and shrieked in triumph, which brought them running – they chased me upstairs all the while trying to grab the packet. I locked myself in the bathroom, panting, clutching the tapioca to my chest. Where was I going to hide it? In the cistern? Too soggy (and unhygienic). In the airing cupboard? Too easy to find. So I chucked it out on to the flat roof outside, thinking they’ll never find it there. They didn’t. The monstrous green packet languished there until the evening, when the anti-tapioca rebellion had muted a little and I could bring it back in. But the window was too small for me to climb through, so Edie had to jump on to the roof to retrieve it (so kind, given her aversion to milky puddings), while I mused on what further ridiculousness my sago trip would take us. A few nights’ later, I felt strong enough to make the green tapioca. On the translated-from-Thai packet, it said: ‘Put Tapioca Pearl [sic] in boiling water and stirs [sic] lightly until look [sic] clear.’ I boiled it for about 20 minutes. Still rock solid. Thirty minutes: the edges were jellylike and chewy but the insides tough as old Doc Martens. Forty minutes: enough! We’d eaten our main course ages ago, and here was I still boiling the tapioca. Fine, it was a bit stodgy and solid in the middle, but I reckoned it would continue cooking while I made the custard.
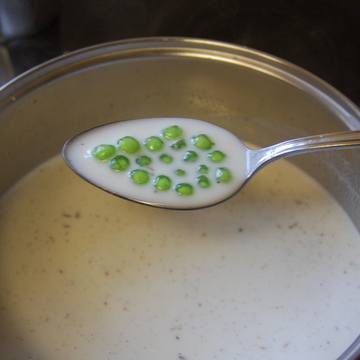
So I drained the water off the green gunge (green slime was drooling from the pearls, worth knowing if ever you want to make your own edible snot for Halloween). I added milk and sugar, brought the mixture to a boil, and stirred in the eggs. It thickened a bit until it looked like cream of spring veg soup, though the green tapioca itself was still tough and gloopy (how long does this stuff take to cook?). I dished it up anyway, straining it into the children’s bowls so they got pure, sloppy custard, while the grown-ups tried (and failed) to munch their way through the still chewy green pellets. Awful. Inedible. Grim.
I’m not sure about the moral of this story, apart from avoid tapioca, sago, and other foreign starches at all times if you want a happy family. But I know what I tasted in that foreign hotel those few weeks ago, and it was gorgeous. For that reason alone, the sago grail is still on my mind…
11th Apr 2009
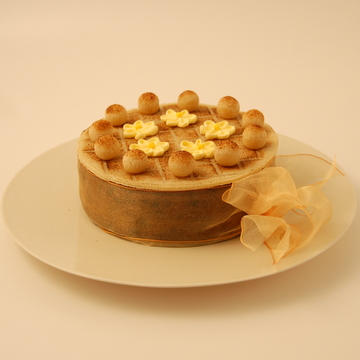
This traditional and delicious cake is fun for all the family to make. For the marzipan For the cake NB: The marzipan topping contains uncooked eggs. 1 Preheat the oven to 180 degrees C, Gas Mark 4 (adjusting for fan oven). Grease and line the base and sides of the baking tin using baking parchment. To make the marzipan 2 Place the caster sugar in a bowl with the ground almonds. Sieve the icing sugar over and mix all together. 3 Whisk a large egg and add it to the dry ingredients. Mix then knead the mixture until a soft dough is formed. 4 Take one-third of the marzipan and, on a board lightly dusted with a little icing sugar, roll it into a circle, using the base of the tin as a template. This will go in the middle of the cake. Put the marzipan in the fridge to cool while you make the cake. To make the cake 5 Cream the caster sugar and margarine in a bowl, until pale and fluffy. 6 In a separate bowl, lightly beat together three large eggs, and stir into the creamed mixture a little at a time. 7 Add the flour, polenta and baking powder to the mixture and stir gently. Then add the sultanas, raisins, currants and candied fruit and mix until combined. 8 Spoon half the cake mixture into the lined tin. Put the rolled layer of marzipan on top, then cover with the remaining cake mixture so you have a sandwich effect. 9 Turn down the preheated oven to 150 degrees C, Gas Mark 2, put the cake in and cook for 1½ hours. Check after an hour and if the cake is browning, place a double layer of baking parchment on top. The cake is ready when a skewer inserted in the middle comes out clean. Leave to cool in the tin, then turn out. To decorate the cake 11 Using a wooden skewer, mark the marzipan top with several wide criss-crossed lines. 12 Form the remaining almond paste into mini eggs or balls (it is traditional to have 11 but you can choose how many you want) and arrange around the edge of the cake. 13 Place the cake under a very hot grill for a minute or so until the topping goes a lovely toasty brown. 5th Apr 2009
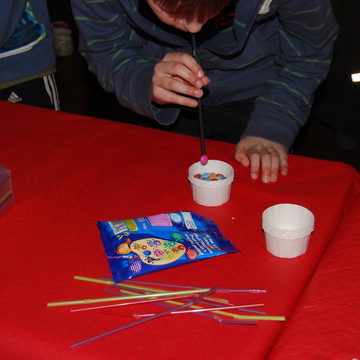
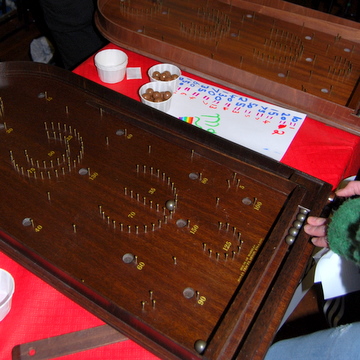
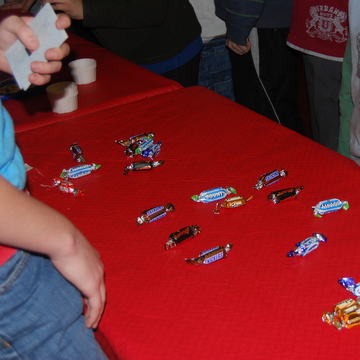
Tamsin: We had great fun at the chocolate evening organised to raise money for the school. The hall was packed and nearly all the chocolate in its various forms consumed. A big hit was the decorating Easter eggs with a colourful array soon adorning the tables. The chocolate games were also much liked and could be enjoyed by family and friends for some Easter fun.
The first used Smarties, some straws and a container. The aim was to suck as many Smarties up using the straw and dropping them in the container as you could in 1 minute. The prize was the container of Smarties you managed to get. Most people got around 20, but some were nearer to 40!
The second game used Maltesers and a bagatelle board. Each person had 10 marbles for the bagatelle and you got a Malteser for each one that scored on the board.
The third game required just a box of Celebrations or similar assorted chocolates. One of each type is placed on the table. Then one of them has to be chosen as the ‘stop’ chocolate. The person in charge of the game chooses this, making sure that the person who is going to play does not know the choice. The player then starts to pick up the chocolates in whatever order they wish to, keeping each chocolate until they pick up the ‘stop’ one which ends their turn. You either walk away with 0 or a handful of chocolates depending on your luck.
|

|